

MiXFits Elements and Colors offer versatile options for creating a customized makeup look. Whether we prefer a matte, dewy, or pearlescent finish or vibrant or subdued hues, these powders can be utilized individually or together, or mixed with other products to expand our makeup options. We most often start with the question, what do we want?
MIXING RATIOS, COLORS TO ELEMENTS
HOW TO MIX POWDERS
-
Mixing ultra-fine powders requires air. The movement is necessary for the most even mix. Remember to avoid dust inhalation. Fans are excellent.
-
Laying down a protective barrier like silicone, paper or tissue can protect our surfaces from potential stains.
-
Open the mixing bag first. Squeeze the sides together to pop the bag open and allow a little air. Gently pull the bag open a little more if the walls are clinging together.
-
Open the products and put the powders into the mixing bag. When using scoops, we like to measure in packed scoops or loose scoops.
-
Sometimes the powders want to stay in the scoop, so we will tap the scoop on a finger or a hard surface while it is still in the bag to loosen the powder’s grip.
-
The right amount of air in a bag is flexible. We want the air to move the powder as we brush our fingers over the bag. Some like to squeeze the bag a little tighter than others, and that’s okay as long as the powders move. A gentle first few passes helps us gauge whether or not we need to add or remove air.
-
To add air, open the bag and squeeze the sides to widen the area inside the bag, which will pull air in. If the walls of the bag are clinging together, gently pull them apart by pinching the outer walls of the bag. If there’s too much air, the powders won’t move.
-
To remove air, open the bag and gently squeeze out the excess. The more gently it’s done, the less powder escapes.
-
Ensure the bag is closed and zipped before mixing. Pinching the zipper seal with one hand, place the bag between the fingers of the other hand and apply enough pressure to move the air, which blends the powders.
-
Mixing happens before your eyes. Some people like to swipe 5 or 6 times. Others like to swipe a lot more.
-
Test the mix by either dipping a clean brush in the bag or pouring a tiny sample of the powder into a container or on a palette.
-
Do you want to mix it more or add colors or performance? Repeat.
CREATE MAKEUP WITH ELEMENTS AND COLORS
-
Texture, Color, and Performance are the three building blocks that make up all makeup products.
-
When creating a finished product, we like to start with the Colors, picking and mixing to achieve what we want for whatever application we are after. MiXFits Colors are not finished makeups. They do not apply smoothly and evenly, nor will they wear with any predictable result.
-
We use the Neutral Line to control the level of darkness. As a general rule for all products of any brand, going lighter takes more resources than going darker. We often err too light for simpler adjustments.
-
The Spectrum Line is great for adjusting undertones and/or overtones, or to produce brilliant color results without level adjustments.
-
Many of the Spectrum Colors are extremely effective in tiny quantities.
-
The regulation images located on the labels tells us if any MiXFits products are restricted in use.
-
Color Theory is the tool for perfecting our desired color.
-
For detailed instructions on how to achieve the most uniform powder blend, see our MiXTips Section: HOW TO MIX POWDERS.
-
Once we have our color, or if we didn’t want color at all, we consider the Performance part of makeup, which is the smooth, even application that either stays on the skin or doesn’t.
-
The MiXFits Elements are where we find our colorless, semi-transparent performance options.
-
Unattached is the Element without a finish and without stay power for short-term performing makeups like setting powders or fallout veils.
-
Elements with a finish have stay power for any kind of makeup we want to have longevity, like foundation or eyeshadow or lip color or blush.
-
Sometimes we mix Elements directly into the bag with our Color. Other times, we’ll leave the Colors unadulterated and scoop what we want into a new mixing bag.
-
We keep track of amounts used in parts so we can recreate what we’ve made.
-
We use the 1:1-2 ratio, which gives us true-to-color results with solid performance.
-
The next building block to consider is texture. At this stage, we have a finished powder product. Powder is the lightest texture with the lightest coverage. If we want more coverage or a specific kind of texture like a cream or a liquid, we’ll want a Modifier.
-
We look forward to releasing our texture modifying solutions, but until then, MiXFits powders are compatible with all kinds of products. For more on this, see our MiXTips Section: AFFECTING OTHER PRODUCTS.
-
Having the basic parts of all makeup at our fingertips expands our library of colors and effects, gives us control over what we use and why, and expands opportunities in both our art and our service.
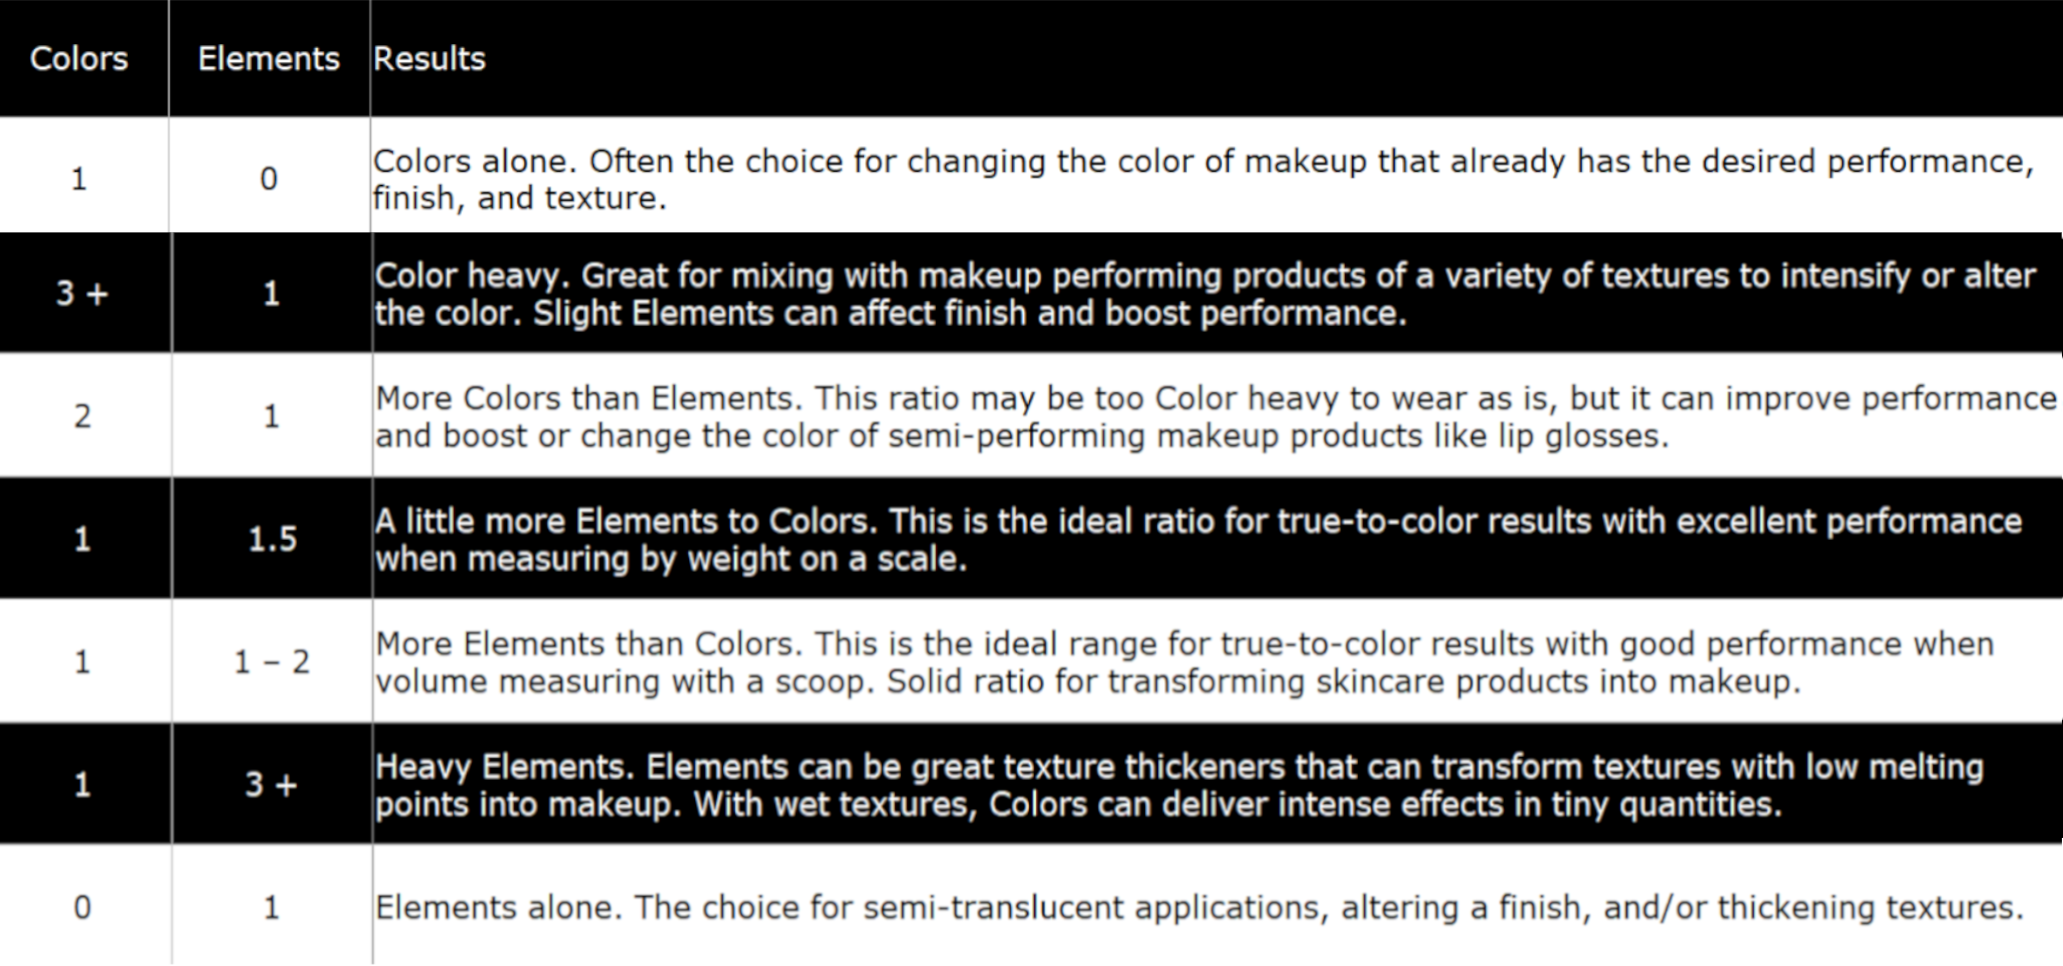
AFFECTING OTHER PRODUCTS - THE MIXING RATIO TABLE
-
The Mixing Ratio Table is our at-a-glance suggestion tool for selecting what MiXFits products we'll use and how much. While there are so many possible applications, we find they usually fall to two methods of use, intermixing and/or layering.
-
Intermixing is often premixing, which can happen in a mixing bag or our palms, on our palettes, or sometimes directly on the skin.
-
Layering is most successful when the underlayer is fully set, whether with body heat and patience, or with a short-term performing powder. The powders are so light, layering over set makeup doesn't build on the feel.
-
The bottom of the Mixing Ratio Table suggests 0 parts Colors to 1 part Elements. This is working with just Elements, which we'll do if we want to create or improve performance, affect the finish, and/or thicken a texture of another product.
-
We can tone down a reflective finish with a powder overlay of the Matte Element.
-
We'll intermix the Elements to thicken texture products with low melting points, like petroleum or un-petroleum, or shea butter or a wax base. The right consistency depends on our goals and preferences.
-
Elements and skincare work well together, intermixed or layered. The Elements can give a light sunscreen or lip balm the performance of makeup with a finish, and a soft, colorless blurring effect.
-
The Mixing Ratio Table tops off with a 1 part Colors to 0 parts Elements ratio. On this end, we are only working with Colors, usually because we want to affect something that already has the performance and texture of makeup that we want, like liquid foundations, cream eyeshadow or lipsticks.
-
Because the MiXFits Colors do not have performance, we will likely be intermixing with them instead of layering.
-
What color we want will often depend on what level we need and what Color Theory dictates.
-
For more on selecting Colors, see our MiXTips Section: COLOR THEORY.
-
The Color to Element ratio suggestions sandwiched between just Elements and just Colors on the Mixing Ratio Table gives us ideas of what we can do with varying degrees of color to performance.
-
For instance, 1 part Colors to 3+ parts Elements might look like intermixing a touch of color to a thickened texture product. Premixing the Colors and Elements in this ratio can be used to neutralize minor discolorations.
-
All kinds of makeup applications can be achieved with 1 part Colors to 1-2 parts Elements. This is the ideal ratio window for intermixing Colors and Elements when using the scoops for volume measuring, for true-to-color results and good performance.
-
For more information on this, see our MiXTips Section: CREATE MAKEUP WITH ELEMENTS AND COLORS.
-
MiXFits formulas in this ratio are excellent for intermixing with skincare products that lack both performance and color. We'll use a quarter to a full loose scoop of our MiXFits formula to a days serving of lotion with spf and mix them together in the palm of our hands for moderate coverage and excellent stay-power with that sun protection.
-
If we want to use a scale for precise formulations of our Elements to Colors, we use 1 part Colors to 1.5 parts Elements for good performance and true-to-color results. Using a scale makes recreations easy and gives us the ability to create a retail product. We like to use a jeweler's scale with a readability of .001g. A thousandth of a gram
-
2 parts Colors to 1 part Elements is pretty color heavy, especially when working with Spectrum Colors.
-
If applying as a layer to a performing base that is still tacky, this ratio can increase the color intensity and boost the performance of the overall look. For instance, lip glosses tend to be weak in both performance and color, which can be adjusted with a 2:1 MiXFits underlayer, that can boost the tone and increase longevity.
-
3 or more parts Colors to 1 part Elements, like working with just Colors, will likely be intermixed with a makeup product that already has the texture and performance we are after, but maybe we want it slightly thickened or with a little more shine.
-
Some scenarios will be a mix of these, like when working with an airbrush.
-
Because the Elements can be too thickening for an airbrush gun, we might apply them on the skin first as an underlayer, and then apply an airbrush mix of our Colors with an airbrush mixing medium. Sometimes we'll add more Elements between airbrush layers after they've set.
-
With MiXFits, we have so many possible solutions in light-weight, simple products. The Mixing Ratio Table can help us approach individual makeup obstacles and create custom, applicable effects in the moment, which means the products we love can go further, and be so many things.

COLOR THEORY
MORE COMING SOON
PRO TIP: Makeup doesn’t always have color, but it is a color art. Color Theory is necessary to not only understand how colors behave with one another, but to have control of the colors for both immediate adjustments and color creation. Color theory wheels are handy tools for quick references. Hands on, experimental work with the three primary colors can lead to color recognition and application mastery that needs no reference.

Primary Colors are colors that cannot be achieved by mixing. Traditionally, Red, Yellow, and Blue are thought of as Primary Colors

Secondary Colors are the equal presence of two Primary Colors. When working with the RYB Color Wheel, the Secondary Colors are:
Yellow + Red = Orange
Yellow + Blue = Green
Blue + Red = Purple
When all three Primary Colors are present, they “neutralize,” or desaturate each other to create muted neutral tones often referred to with terms like “brown,” “beige,” “tan,” and “fair.”
"Neutralizing" and "concealing" are terms often considered synonymous. Whether you think of them differently or not, both utilize all three primary colors.
The Color Wheel gives us a visual reference for predictable results. Colors directly opposite each other on the wheel are generally considered the go-to for neutralizing (a blending of the primaries) or complimenting (not blending; juxtaposition). You can imagine neutralizing yellow with blue and red, or you can look at the Color Wheel and see violet (blue and red).